In Part 1 “Hello Azure” we briefly talked about the Service Configuration file (ServiceConfiguration.cscfg). In that article we didn’t modify this file, we just accepted all the values provided by Cloud Service Visual Studio template.
Let look at this file and take it apart.
<?xml version="1.0"?>
<ServiceConfiguration serviceName="LearnAzure" xmlns="http://schemas.microsoft.com/ServiceHosting/2008/10/ServiceConfiguration">
  <Role name="LearnAzureWeb">
    <Instances count="1" />
    <ConfigurationSettings>
      <Setting name="DiagnosticsConnectionString" value="UseDevelopmentStorage=true" />
    </ConfigurationSettings>
  </Role>
</ServiceConfiguration>
 The root element ServiceConfiguration has only one attribute which is serviceName. The serviceName attribute is required. If you omit this attribute, Visual Studio is going to complain about your XML during compilation. You can see that this attribute has the same value as our Cloud Project which is LearnAzure. The name of the service must match the name of the service in the service definition. If you look inside ServicDefinition.csdef file, you’ll see that value for the name attribute in ServiceDefinition element is also LeanAzure.
ServiceConfiguration element can have only Role elements as children. Because the only role we have is ASP.NET Web role, LearnAzureWeb, we can see only one Role element. In case our project contained another role the Service Configuration file would reflect this fact.
Role element also has a single name attribute which is required. The name attribute represents the name of the service and must match the name of the service in the service definition defined in the WebRole element. The Role element can have following children elements:
- Instances
- ConfigurationSettings
- Certificates
Looking at our ServiceConfiguration.cscfg file we can see that it contains ConfigurationSettings and Instances elements.
Instances Element
Before we start discussing the Instances element, let me tell you what I know about Microsoft datacenters that host Windows Azure applications. Microsoft has many strategically placed datacenters that have no physical roof. Inside each datacenter a lot of sealed shipping containers. Each containers has inside anywhere from 1,800 to 2,500 servers. One of these datacenters is located in Chicago.
Now back to our Instances element that has a required count attribute that represents number of instances of your application. In case our Learn Azure application becomes a hit, we will need more computing power to run it. We’ll request more power by increasing count value in the Instance element. Each instance will be run on different server and probably in different container. And I’m going to guess that it has a very good chance that each instance will be executed in different datacenter.
<Instances count="5" />
Instances element is required and you can have only one element in each Role.
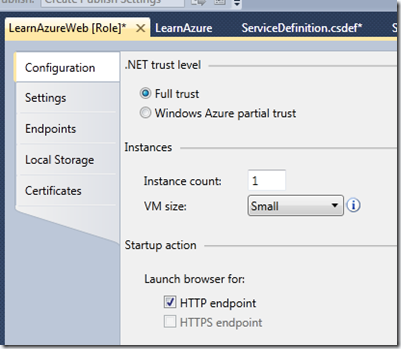
If you are not friendly with XML, you can modify Instance count using GUI in Visual Studio. In your Cloud Project right click on the Role and select Properties or just press Alt+Enter.
In Configuration tab you can find Instance count and enter the desirable value.
ConfigurationSettings Element
If you’ve developed any .NET application, than ConfigurationSettings element concept should be very familiar to you. You used this technique many times in your web.config or app.config files. It serves the same purpose as appSettings element in .config file.
You can have only one ConfigurationSettings section in your Service Configuration file. This element is not required that means that you can completely omit this section if you don’t set any custom settings. ConfigurationSettings element can have any number of Setting elements. A Setting element is a mapping of a name to a string value. A setting name must be declared in a service definition file (ServiceDefinition.csdef).
For example, in our LearnAzure application we hard coded “Hello Azure!” text in the Default.aspx file (See Part1). We can easily make the hard coded text configurable.
First thing we’ll do is to add our setting name “myText” to the Service Definition file.
<Setting name="myText"/>
Below is complete ServiceDefinition.csdef file.
<?xml version="1.0" encoding="utf-8"?>
<ServiceDefinition name="LearnAzure" xmlns="http://schemas.microsoft.com/ServiceHosting/2008/10/ServiceDefinition">
  <WebRole name="LearnAzureWeb">
    <InputEndpoints>
      <InputEndpoint name="HttpIn" protocol="http" port="80" />
    </InputEndpoints>
    <ConfigurationSettings>
      <Setting name="DiagnosticsConnectionString" />
      <Setting name="myText"/>
    </ConfigurationSettings>
  </WebRole>
</ServiceDefinition>
Next we need to add the Setting element with a name and value into ConfigurationSettings section of our Service Configuration file.
<Setting name="myText" value="Hello Azure from the Configuration!" />
Here’s the copy of the complete ServiceConfiguration.cscfg file:
<?xml version="1.0"?>
<ServiceConfiguration serviceName="LearnAzure" xmlns="http://schemas.microsoft.com/ServiceHosting/2008/10/ServiceConfiguration">
  <Role name="LearnAzureWeb">
    <Instances count="1" />
    <ConfigurationSettings>
      <Setting name="DiagnosticsConnectionString" value="UseDevelopmentStorage=true" />
      <Setting name="myText" value="Hello Azure from the Configuration!" />
    </ConfigurationSettings>
  </Role>
</ServiceConfiguration>
You don’t have to manually modify custom settings. Visual Studio provides us with GUI to add, remove, or modify our settings. Select property on our Role and on the left chose the Settings tab.
We are done with configuration. Now let use “myText” in our source code. In our Default.aspx file we need to replace
    <div>
    Hello Azure!
    </div
with
<div>
<asp:Label ID="mainTextLbl" runat="server" />
</div>
We just added a new Label control.
The only thing left is to read the value from the configuration file and assign it to our mainTextLbl Label control. We’ll do it on page Load event in Default.aspx.cs file.
protected void Page_Load(object sender, EventArgs e)
{
    mainTextLbl.Text = RoleEnvironment.GetConfigurationSettingValue("myText");
}
Now we can compile and run our application on local computer.
Now you know how to set basic custom settings for an Azure application.
Certificates.
I believe that discussion of certificates deserves its own article. I’ll try to talk about it in the future posts.
Why another XML configuration file?
You are probably wondering why do we need another XML configuration file (in this case ServiceConfiguration.cscfg). We can perfectly set the setting in my Web.config or app.config files. That’s true but then you’ll have to repackage and redeploy the whole application again.
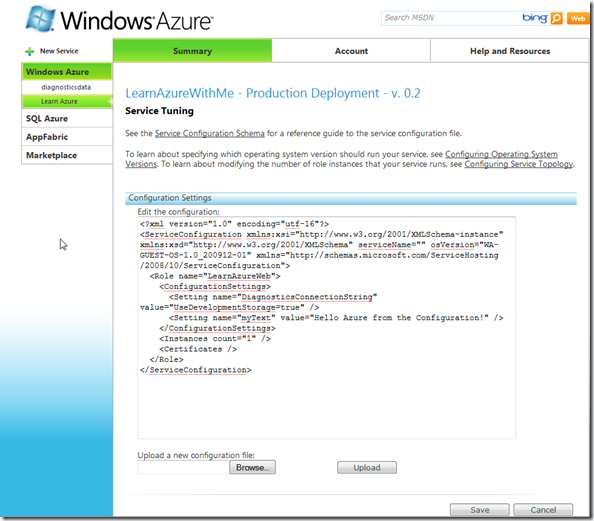
You can modify ServiceConfiguration.cscfg file from your Azure portal and no redeployment will be required.
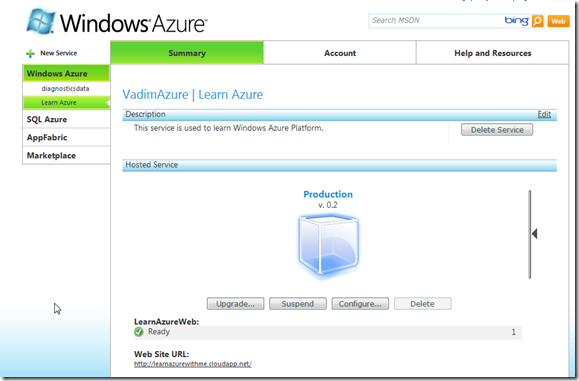
To change configuration just login to your Windows Azure portal, select the service and click on Configure button.
From Service Tuning page you can modify the existing Service Configuration file or upload a new one.
Summary
Now we have basic knowledge how to configure our Azure application. We learn about Instances and custom settings. In future article we’ll learn about certificates.


